
The DARS relay design has been through a number of iterations and this is the latest version.

On top of the picture is a 12 inch scale to provide an idea of the size. On the far right is a ribbon cable which is used to connect the circuit card just to its left to all of the other internal components. And finally on the left is the complete relay.
Relayer features:
The DARS relays are designed to be used with the clubs launch controllers which are designed primarily to launch model rockets and as such have high current outputs. The relay just looks like another igniter to the controller. The cable running from the relay to the launch controller is one or more standard 100' AC extension cords.
Extension cords are used because they are relatively cheap, easy to find, and tough. Notice that the relay has a socket. No one will mistakenly plug this into a wall outlet. Ever. Not that there are a lot of wall outlets in the field but you never can tell what someone will do during the 99% of the time the relay isn't at the flying field.
Setup and use of the relay is pretty simple. The black and red clips are attached to a 12V battery. If the piezo buzzer in the relay starts to scream at this point, check to make sure that the battery polarity is correct. The relay can launch a rocket with a reversed battery but the continuity test and stuck relay circuits will not function, If after checking the polarity the buzzer is still screaming, the relay is stuck closed and the relay must be repaired prior to using it. An extension cord is then plugged into the socket and the igniter cord is plugged into the binding posts on the right of the box.
At this point it is a good idea to connect a test load to the igniter clips (Either a power resistor and volt meter or used Estes igniters. The steel wire in the Estes igniters works quite well as a test load.) This test will verify that the relayer is working, connected correctly, and it is on the launch controller channel that you think it is.
The first thing that a flier should do after getting to the pad is to make sure that the Safe/Arm switch (center) is in the safe position. This breaks the connection between the relay and the igniter clips preventing any fault from causing an inadvertent launch. The flier should also be listening to the relay. If it is screaming at him, the relay contacts are closed. There is a fault in the relay and it should not be used.
Then the flier connects the clips to the igniter, presses the red continuity test button and looks for the LED to come on and the piezo buzzer to buzz. If they do, then the Safe/Arm switch should be switched to the Arm position.
The Safe/Arm switch also disconnects the coil of the relay from the launch controller. When the relay is armed the controller will show good continuity but this only indicates that the relay is armed and not the status of the igniter.
The DARS launch controllers can pull in the relay through many hundreds of feet of extension cord. One controller (Boris) has a design flaw (high side N channel MOSFETS) that limits its output voltage and it cannot operate a relay beyond 300'.
Most of the circuitry for the relayer is on a small printed circuit board. Several relays have been built with this circuit using point to point wiring and it takes a bit of work to complete. So for this batch of relays, a printed circuit board was created to hold the parts.
Here is the schematic for the printed circuit board. Click on the image to get the higher quality pdf version.
| Part | Part Number |
| D1-D5,D11-D15 | 1N4148 |
| D7-D10 | 1N4007 (Actually just about any of the 1N4000 series will work fine.) |
| Q1, Q2 | 2N2907 or other general purpose PNP transistor in a TO-92 package. (See addenda) |
| R1, R3, R5 | 10K 1/4 Watt resistor |
| R2, R4 | 1K 1/4 Watt resistor |
| J1 | 16 pin header. 0.1 inch spacing two rows of 8 pins |
The upper left corner shows the bridge diode that goes between the control circuit and the relay coil. OK, the relay coil is not really polarity sensitive, but some relays do have diodes built into them. This circuit also serves to damp the inductive kickback when the control circuit is de-energized and will work no matter what the polarity. You do lose 1.2 volts to the diode drop which could limit the distance from the launch controller to the pads but is not typically a problem.
DARS uses standard 100' extension cords to connect up the high power pads. They are inexpensive and easily found if you need some more in a hurry. If you need to know the maximum distance the relayer can be from the controller, you need to know a few things: the driving voltage (typically 12V), cable resistance, relay coil resistance, and relay operate voltage. For example...
One particular relay has an operate voltage of 7.2 volts and a coil resistance of 90 ohms. 14 AWG (American Wire Gauge) wire has a resistance of 2.525 ohms per thousand feet. The maximum wire run will be:
First figure the maximum cable resistance using a voltage divider equation
7.2V = (90/(90+X))*(12V-1.2V)
X = 45 ohms
Maximum cable length is:
45 ohms / (2.525 ohms/thousand feet) = 17,820 feet.
Remember to cut that distance in half (the wire runs both ways). So the pad could be a maximum of about 9000' from the controller. This provides plenty of margin for the things that I ignored in the calculation like dirty connectors, battery internal resistance, and such.
D1 through D5 provide polarity protection for the transistors and also drop the voltage (V+) well below the battery voltage. Which is important.
Q2 and associated parts form the continuity test circuit. See the wiring schematic (below) for more details on what is connected to the various points. The push to test switch is connected to CTA and CTB which provides power to the continuity test circuit when activated.
Q2 is a PNP device so to turn it on, the base must be at a lower voltage than the emitter. R1 pulls the base up to the emitter voltage and keeps Q2 off unless there is something connected to point 'C' that pulls the base low. In this case it would be an igniter. Once Q2 is on, it provides power to the LED which is in series with the piezo buzzer. The buzzer limits the current so no current limiting resistor is required to protect the LED.
D12 and D14 combine to activate the piezo buzzer if you connect the battery backwards.
The typical test current is about (12V - 6 * 0.7)/ 6,000 ohms or ~1.5 milliamps. (Note that current goes through both R1 and R3.) The worst case current in the event of a single point circuit failure (R1 fails shorted) is (12V - 6 * 0.7V)/ 1,000 = 7.8 milliamps. This worst case current is safe for most igniters. The one possible exception is flash bulbs. No one has tested flash bulbs to establish a no-fire current level. Since there is no test current unless the button is pressed, the simplest thing to do with extremely sensitive igniters is to skip the test.
Q1 provides the stuck relay warning. While the circuit looks simple, there are some subtle features to its operation. The base of Q1 is biased to a voltage 5 diode drops below the battery voltage. If the emitter (point 'R') is one diode drop above that voltage, then Q1 will turn on and the piezo buzzer will scream. Since this point is tied to the output side of the relay, this will happen when the relay contacts are closed. But when the relayer is armed, points 'C' and 'R' are tied together by the safe/arm switch. Because of D15, the voltage applied to the emitter of Q1 is a diode drop below its base and it doesn't turn on. This is good because it will not be activated when performing the continuity test.
The rest of the wiring is shown here:
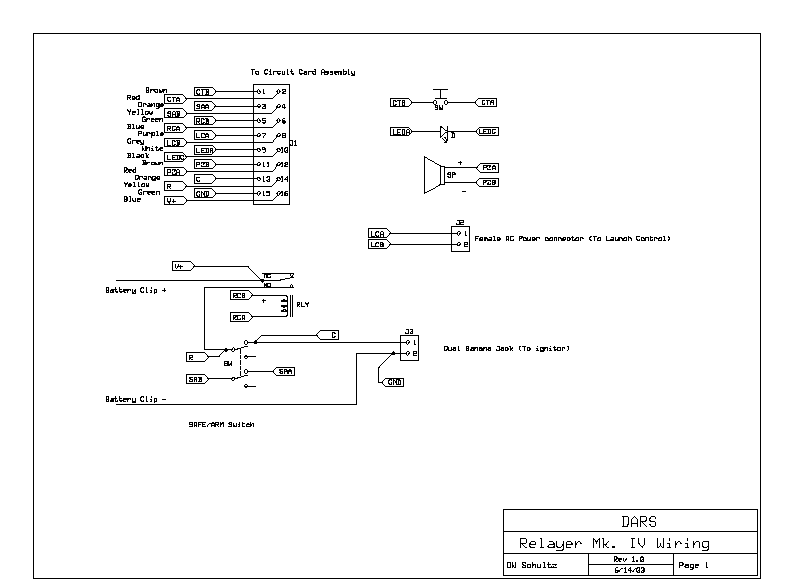
Again, click on the image to see the higher quality pdf version.
All of this is pretty simple. The only thing that needs a little explanation is the safe/arm switch. Besides disconnecting the igniter from the relay and making sure that nothing bad can happen while you are connecting the igniter, it also disconnects the control circuit. This does not improve the safety in any way but it does provide an indication to the launch controller that the pad is either safe or armed. The DARS launch controllers are all designed primarily to control model rocket pads via direct connection and therefore have continuity circuits built in. This occasionally causes confusion when the user forgets the details.
If you want to build one of these, here are the details:
The printed circuit cards were purchased from ExpressPCB. In order to get cards made you will have to download their design software and install it on your computer. Then you can grab the design file and order (via the Internet of course) your cards. For $59 (current price for "Miniboard" service) you will receive 3 cards that have 4 copies each of this circuit. Cut into 4 pieces each and you now have cards to make 12 relayers.
Purchase the parts and start stuffing the boards!
One construction hint. When I built a dozen cards, I looked at all of the diode leads I would have to bend and nearly quit. But then I realized that there was an easy way to do it. First I clamped a few pieces of fin stock (plywood) together until the thickness matched the hole spacing for the parts. I then grabbed a group of diodes, handily held together with tape, and bent the leads over the form. I was able to do the 120 1N4148 diodes in minutes. Then instead of trying to pull off the tape (and perhaps mangle the leads in the process) I just cut the diode leads. They were plenty long so this wasn't a problem.
After completing the cards, clean all of the flux residue using alcohol. Flux attracts moisture and combine that with the motor combustion products and you will have corrosion. Bad news.
As an added protective measure, you might want to conformal coat the cards. This provides a protective coating that will keep all of those nasty sulphur and chlorine combustion products away from the parts and the copper traces. I found an aerosol can of conformal coat at the local Fry's electronics store. Just be sure to mask off those parts that you don't want to coat before spraying. In this case, you only need to worry about the connector. Which should have gold plated pins.
The card should outlive any other part in the relayer!
The relay used is a typical automotive type. For ease of replacement, put this into a socket. You can purchase a suitable relay and socket from All Electronics (relay PN: RLY-631 socket PN: SRLY-2) for $3.40 a set (10 or more). This type of relay will eventually fail because of the abuse it takes. You can either find a relay/contactor rated at a few hundred amps or just put a cheap automotive relay in a socket and replace it every year or two. This is a lot cheaper than high current relays.
Because the Safe/Arm switch must pass the igniter current, do not use a cheap low current part. Some 3 Amp rated switches made it into a couple of DARS relayers and had to be replaced because they sacrificed themselves to protect the igniter. Use a 20 Amp rated DPDT switch.
The completed relayer should be tested periodically to verify operation. You will need a few pieces of test equipment:
The test steps are:
One of the relayers died and the mode of failure was interesting. Apparently what happened is that after launch the igniter clips stayed shorted together. The relay contacts also welded closed and the result was a lot of current and no way to shut it off. This resulted in a fire when the wire insulation failed.
The damage to the relayer was limited to wire, the relay, and the safe/arm switch. But after this incident I started looking for a way to keep it from happening again. A fuse is the obvious first choice but it is hard to determine just what size fuse to use. Too small and you are constantly replacing them. Too big and it might as well not be there. What I settled on is a fusible link.
This is just a piece of wire 4 wire gauges smaller than the wire you want to protect. In the event of a sustained overload, the smaller wire should fail before the larger suffers significant stress.
Construction of the link is quite simple. Since we use 18 AWG wire for the run to the igniter clips, I used six inches of 22 AWG wire. I terminated this in 1/4 inch "faston" style terminals. Female on one end and male on the other. Since having the ends of this wire flopping around inside the relayer is not a good thing, I covered the wire with fiberglass sleeve. The website where I got this idea from recommends a silicone covered fiberglass sleeve. When I saw that this was ~$100 a roll at Mouser, I opted for the much less expensive uncoated.
The relayer is modified by cutting the wire from the relay socket that goes to the positive battery clip and installing connectors on the free ends. By using one male and one female you have the option of removing the link. If you do this while building the relayer, install a terminal on the wire from the positive battery clip and be sure to include the wire that goes to the circuit card. Then install another terminal on the wire from the relay socket.
While checking out the relayers prior to NSL I did something I hadn't done before. While checking the continuity test currents (which I had done before) I forgot to set the safe/arm switch to safe. I was surprised to measure a current of about 1.5mA.
After looking things over and digging out a data sheet for the 2N2907 transistor I discovered that we are exceeding the 5V emitter-base reverse breakdown voltage for Q1. The result is a higher than expected leakage current. The current is not high enough to represent a hazard but in the event that R4 fails to a short it could be a hazard. I dislike single point failures of this sort.
The obvious fix would be to use a transistor with a higher breakdown voltage. But a quick check hasn't found any and I suspect that this is the nature of the beast.
However, a Darlington pair should have twice the breakdown voltage. A quick check with a pair of 2N2907's showed that this was the case and there was plenty of design margin.
Digi-Key stocks the MPSA63 and MPSA64 Darlington pairs. They come in a TO-92 package and are a direct replacement for Q1.
A MPSA63 (or equivalent Darlington device) transistor should be used for Q1. It may also be used for Q2 if you wish to use only one transistor type.
I worked up a version of this PCB using the gEDA tools with Gerber outputs so I could order from more places. I haven't had to build any so the design hasn't been verified. But $12 will get you three copies from OSHPark.

The safe/arm switches are apparantly failing with a high resistance. Possibly because they are being switched "dry". Cycling them a few times with a few amps of current should fix that. But it requires opening up the case so the relay side of the switch can be bypassed.